We’re Fly.io and we make it easy for developers to do hard things without breaking a sweat, like deploying applications close to your users and scaling to exactly what you need in the blink of an eye. Or, in the case of this article, launching applications with Postgres with incredible simplicity.
In 2021, we launched Fly Postgres to resounding fanfare - seriously, we'e still cheering about it to this day. For folks who need a straightforward, familiar database storage solution and aren’t too pressed about managing it themselves, it’s an incredible and flexible storage option. In addition, launching an application on Fly with Postgres is so simple that it kind of feels like magic.
Launching a new app with Postgres is trivial. I’m not even exaggerating, and to prove it we’ll be walking you through the process of launching a basic Remix app on Fly that you can follow along with.
This demo is meant to be a starting point for folks who are new to using Fly Postgres. You can use it as a playground for experimentation, whether you’re familiar with Postgres but want a low-stakes, simple example to tool around with directly or are new to Postgres and/or relational databases as a whole. Feel free to turn the code completely upside down.
The three primary steps we’ll go through are:
- Launch our app
- Tweak our database settings
- Deploy changes
We can also use the DATABASE_URL environment variable directly within our code as soon as Postgres is up and running without any extra work, as it’s automatically configured as a secret during provisioning.
Okay, so what does this look like in action?
Want to experience this process but don’t have anything you can actively test with? No problem! We created a simple Remix app which you can find in this repository.
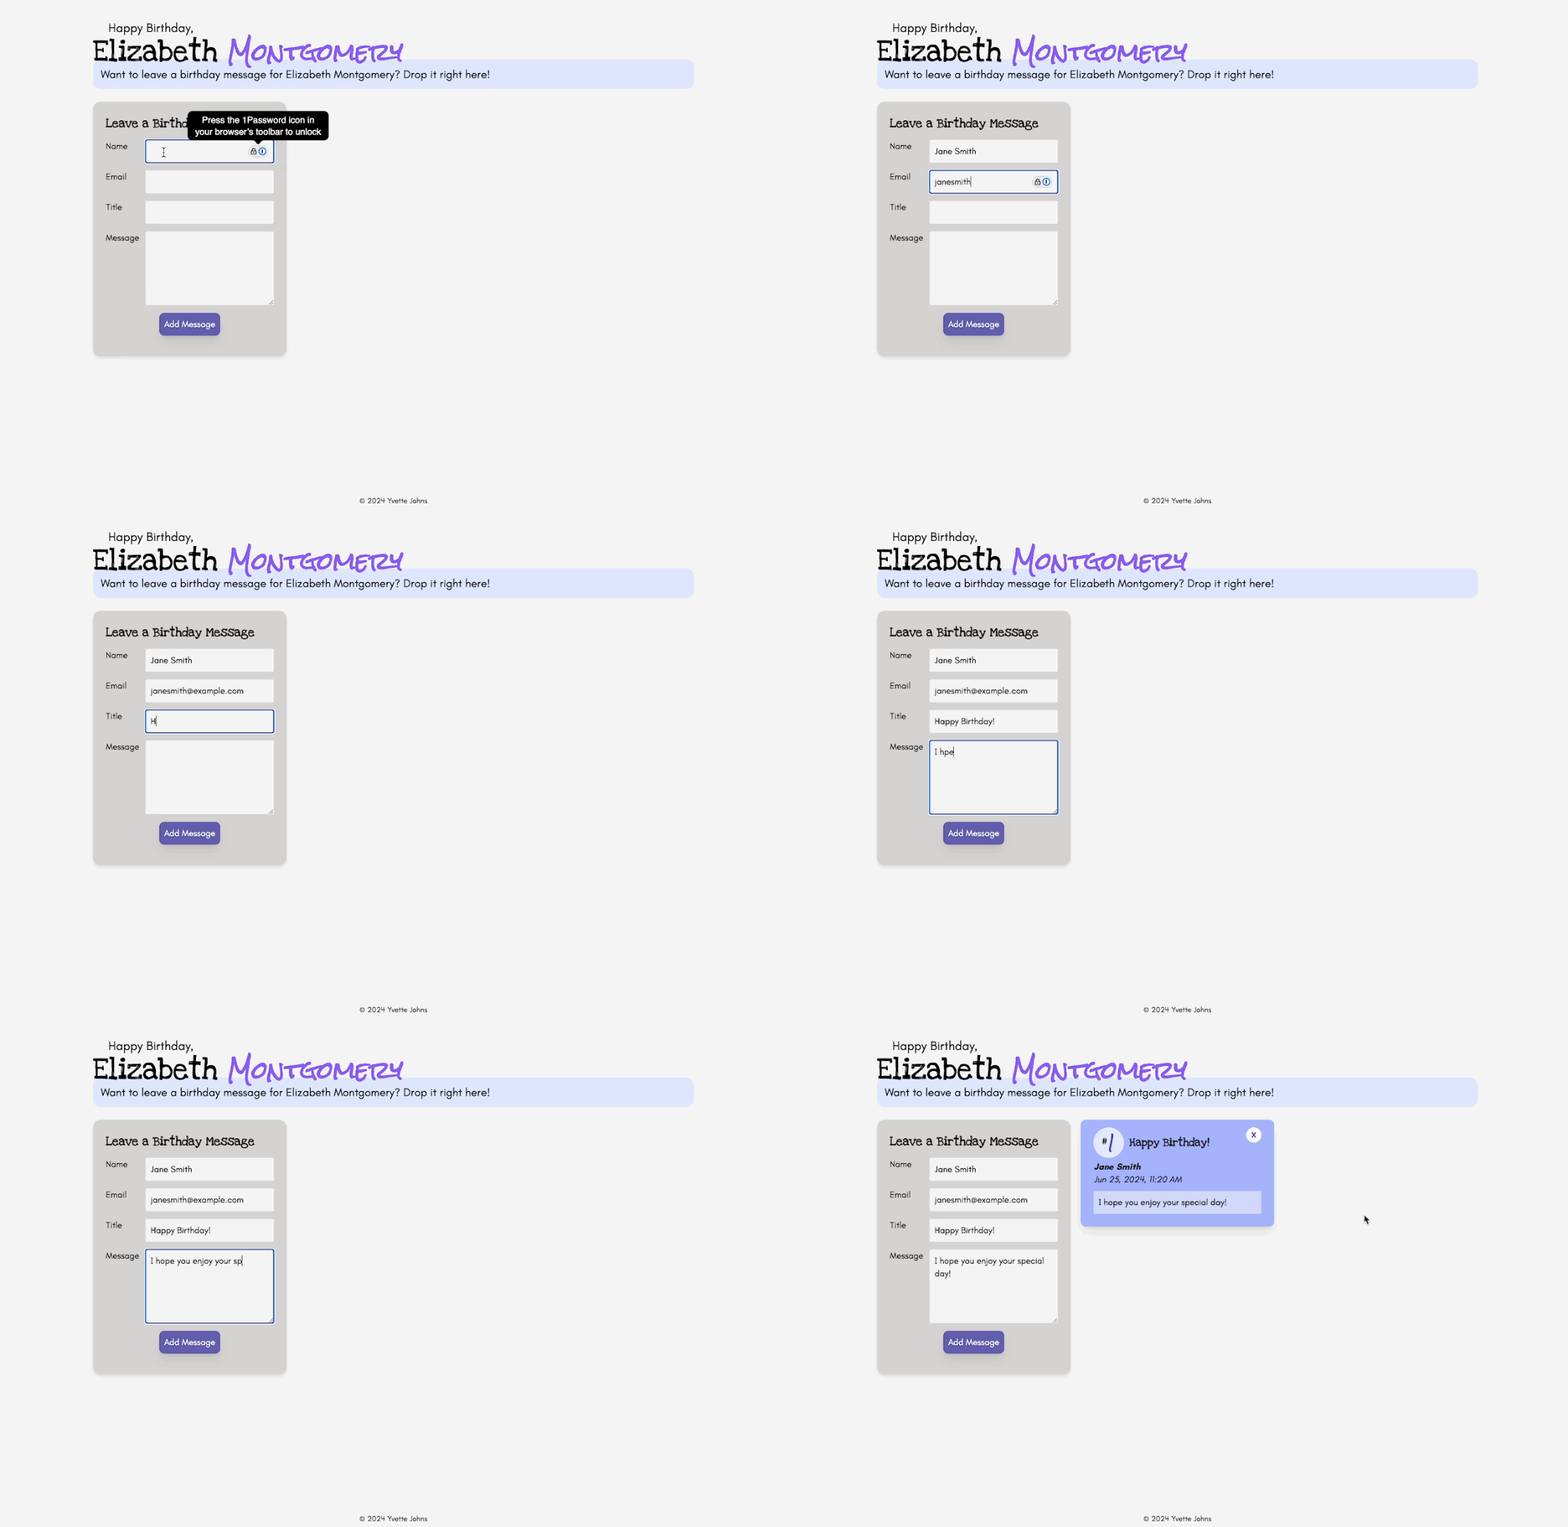
Picture this: Your best friend’s birthday is coming up and you want to gather ‘happy birthday’ messages from their friends and family as a surprise. So, you’ve created a simple online guestbook with Remix and have decided to use Postgres, leveraging the Prisma ORM, to store those messages.
Clone the repository linked above, navigate to the directory in your terminal, and get ready to follow along with us.
Our Application
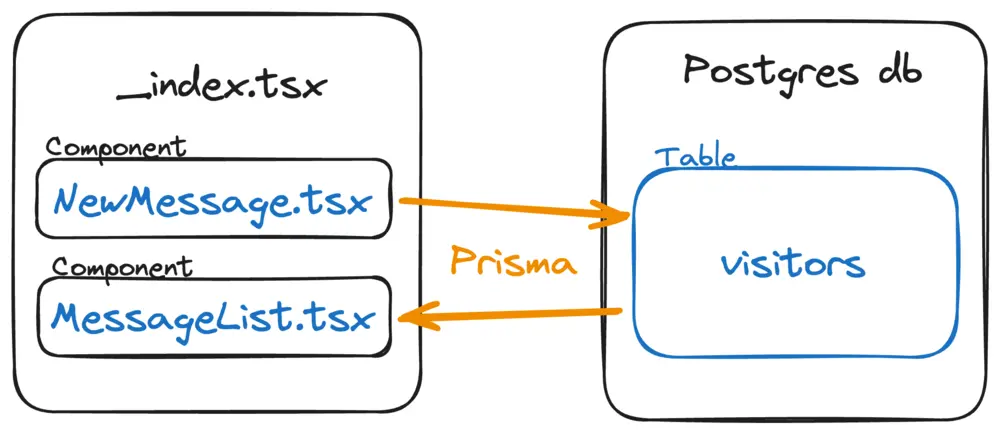
First, I’ll provide a little foundational information about the project that should help you as you’re looking through the files. The structure itself is simple:

Our guestbook itself only uses a single page (fancied up with TailwindCSS), so the only route we’re concerned with is _index.tsx. The header of this page explains its purpose: to allow folks to post messages for our bestie’s birthday. In our <main> element, we’ve imported two components via our index route: NewMessage.tsx (a form that writes submitted messages to our database) and MessageList.tsx (a section of code that displays submitted messages on the page).
We make use of Prisma in this application - an incredibly robust open-source ORM that simplifies the process of building projects with databases. In our demo app, we’ve used it to inform the overall structure (essentially, what fields will house what kind of data and in what way and/or capacity) of the data we’ll be storing in our database by creating a model in a Prisma schema, which you can find in /prisma/schema.prisma.
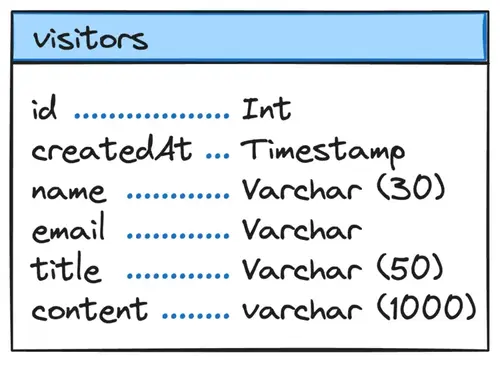
In our case, we only need one table in our database so we only have one model in our schema. We’ve named that table visitors and it contains fields for id (we use this to number our messages), a createdAt timestamp, name, email, message title, and message content.

Step 1: Flyctl
Everything begins with flyctl, the command-line interface for Fly.io. You’ll want to install it as a first step. Then, we’ll kick things off with the Fly Launch command:
fly launch
This creates a Dockerfile, a fly.toml config file, and any other platform resources necessary to get your app up and running on a Machine. Flyctl is clever enough to recognize we’ve used Prisma in our application, and so it understand it should set up Fly Postgres for us by default.
If you want to tweak those settings, you can select y when prompted to be taken to the web interface where you can customize the name and configuration settlings for your database. Otherwise, we can select n to proceed with the settings that have been selected for us. With your settings confirmed, two apps will be created: one for your app and one for Postgres.
Flyctl will handle provisioning and completing the first deployment of your application all in one fell swoop, so maybe enjoy a snack while it does its thing - but maybe a small one. It won’t take as long as you think.
Thanks to Prisma and flyctl, all the heavy lifting has been done for us. During the development process, we declared a DATABASE_URL in our .env file in order to connect to our Postgres database. However, since we’ve already created our database schema with Prisma, Fly has everything it needs to move forward with building the database and configuring the DATABASE_URL as a secret for us.
Flyctl will move forward with building your Fly App and getting it up and running, including running your database migration and building your table from the prisma schema. Once complete, the CLI will share a link to your new app, So, why not go add a message?
Step 2: Celebrate
Only two steps? Yep! Only two. Your application and its associated database are up and running and you didn’t even break a sweat.
Moving forward, you’ll rely on the fly deploy command when deploying changes to your app.

But what if I want managed Postgres?
It’s true Fly Postgres is unmanaged. If you’re not comfortable with managing things like scaling for memory and storage or outage recovery yourself, then there are definitely managed database providers out there that can serve as great solutions like Supabase.
The process of launching a Remix app using Supabase as a managed Postgres provider only involves a couple added steps, especially if you continue to use Prisma as your ORM to streamline things. We have detailed guidance for using Supabase on our infrastructure but, simplified, the steps look like this:
- Run the
fly launchcommand. Selectyto tweak your options and set the database tononeinstead of using Fly Postgres. - Run the
fly ext supabase createcommand. This will initiate Supabase by creating an account associated with your Fly.io account, set up your db, and set the environment variables for interfacing with it. - The command line will return a
DATABASE_URLandDATABASE_POOLER_URL. We use theDATABASE_URLfor this project. You’ll want to set it as a secret in your app by using thefly secrets setcommand like this:cmd fly secrets set DATABASE_URL=postgres://example.com/mydb - Celebrate!
